Safety Precautions
- Our product is designed to protect human beings from
the bird menace, Please
do not use it for any other purpose.
- Please do note that our product is designed keeping in consideration the weight of
pigeon, crow, eagle, etc., birds.
- Please don't lean against or lean any other object of a
considerable weight
against the net, since there
is a possibility of the net snapping.
- Please carry out the installation of the product after fully
ensuring installation safety.
When sufficient safety cannot be ensured about installation, please
do consult us.
Pre-Installation Activities
- Please remove any dirt like excrement of pigeon from
installation place and make it clean and tidy.
- If the installation place is dirty because of excrement or other
things,
then the sufficient adhesive strength cannot be obtained.
- In case the dirt on the installation place contains oil, please wipe
off with alcohol, etc.
- When installing to the ceiling side, please use the installation stick
for convenience.
- Please check that the installation part is completely
dry.
- Please insert the 'INSHU-Lock'
in installation tool (PETTANKO).
- Remove the temporary lock from "Inshu Lock"
and apply mixed and kneaded bond liquid of 2 types to PETTANKO. (Since
mixed and kneaded bond liquid
hardens in about 5 minutes, please don't mix and knead entire amount
liquids at one go, but at a time mix and knead just enough for about five pieces).
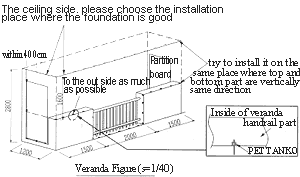
- When installating to a ceiling side, use
the installation stick and install it at intervals of about 40cm.
(Please repeat the steps 2 & 3 until the ceiling side installation is
coplete)
![NOWPRINTING[NOWPRINTING]](images/sagyou.gif)
- After the ceiling side installation
is finished, carry out the bottom and lateral sides installation in
exactly the same way. For better results, please ensure that the points
of fusion to the bottom-side wall are exactly below the corresponding
points of the ceiling side.

- After the installation of "PETTANKO"
to a required place, please check the upper and lower sides of the net
and make sure that it is same (the reinforcement rope is attached only
to the upper part of the net).
The reinforcement rope of net should pass through "INSHU-Lock" of
'PETTANKO" installed on the ceiling side
and "INSHU-Lock" should be tightened to the end. Please screw up
and cut off remainder of the "INSHU Lock".
(Please repeat the step 5 until the ceiling side installation is
complete)
- After the finishing the ceiling side installation please install the bottom and the
lateral sides in the same way. This systematic approach to installation
goes a long way in ensuring that you end up with a fine finish. Finally,
ensure that the net is not too loose. Moreover,
if you gently pull the net with a rope from the
parapet of the veranda it should not loosen. Please stop temporarily
sweeping etc. of the veranda
![NOWPRINTING[NOWPRINTING]](images/beranda.gif)
* That completes the installation of Sellview.
|